
The Project Binder Method
Project Binder started as a small, physical spiral-bound dossier that held all the important master documents needed to run a production. These documents often included storyboards, scripts, production budgets, gear pick lists, client contact info, crew agreements, call sheets, maps, and anything else we needed to reference while on set.
Every job had a Project Binder, and every Producer clutched onto it as it became the bible for production. If something changed or was updated, we’d run to the spiral binder and pry open the book to add or modify our master document.
As each project came to a close, the Project Binder would have its own character — with stickers, sticky tabs, stains, hand-drawn notes, and a weathered cover. You couldn’t help but admire its charm when it was filed away for future reference.
Project Binders became a way of life in our production company — but they were flawed. They were hard to update, hard to keep track of, and especially hard to reference if you didn’t have it on hand.
This was where the impetus for ProjectBinder.io began and quickly grew into a dream to replace spreadsheets, CRMs, and messaging apps — to have a software specifically designed for Photography, Film, and Video Production with a centralized, cloud-based platform.
Why Cloud-Based?
Tools Built for You
ProjectBinder.io was built by photo and video production business owners for photo and video production professionals. We built this app for us, then realized how crucial it was to our businesses and felt we had to share its features with the industry.
Cloud-Based Data
All of your data is stored securely in the cloud using industry-standard cloud computing. Access your projects from anywhere you have an internet connection and know you have the most up-to-date information from your team.
Consistency
By setting your services and equipment pricing in your databases, you’ll have a consistent pricing sheet to operate from. When you duplicate or clone an estimate from a previous project, all the rates remain the same. Your estimate printouts, totals, and branding all stay consistent across all channels.
Security
User accounts that you can manage help you control who can access your information. Different screens and KPIs show profit margins and sensitive numbers while keeping them separate from customer-facing printouts and communications.
Project Stages
Every project in Project Binder follows a defined lifecycle. Understanding these stages helps you navigate the platform:
| Stage | What Happens |
|---|---|
| Lead | Discovery phase. You learn a client is interested, discuss the project scope, shot dates, budget, and deliverables. Ask all the right questions using your Questionnaire to gather what you need for an estimate. |
| Estimate | Build one or more estimates for your client. Use the “Good, Better, Best” approach for sales flexibility. Once approved, move to the Project phase. |
| Project | The most active phase. Plan your project, reserve gear, book crew, and manage your working budget. |
| Rental | Relevant to external rentals — gear reserved and rented out to a 3rd party. (Coming Soon at the Production Company tier.) |
| Reconcile | Log actual expenses vs. budget, rate your subcontractors, generate repair orders for damaged gear, and get a final financial assessment before archiving. |
1. Getting Started & Account Creation
Project Binder is a web-based production management platform designed specifically for photo and video production companies. It helps you track projects from initial lead through completion, manage budgets and estimates, coordinate crew and equipment, and keep all project-related communication in one place.
Project Binder is data-driven. The more complete and accurate your data, the better your experience. Taking time to set up your account thoroughly during this initial phase saves significant time in day-to-day operations.
Subscription Tiers
| Tier | Key Features | Best For |
|---|---|---|
| Videographer | Leads, Estimates, Contacts, Dashboard, Questionnaires | Solo videographers & small operators |
| Producer | + Project Builder, Crew Booking, Production Dates, AI SOW | Producers managing crew & multi-day shoots |
| Production Company | + Equipment Mgmt, Scan In/Out, Gear Scheduling | Coming Soon — full production companies |
| Enterprise | Custom configuration & onboarding | Contact us |
Your Account
When you first create your account, you land on the Dashboard. Before diving in, configure your settings, import data, and set up your team via the gear icon in the top-right header.
The header bar is always visible and provides quick access to: your company logo (Dashboard link), Contacts (Companies & People), Jobs, Rentals, Dashboard, Google Calendar, Notifications, Settings, Bug Report, and Logout.
2. Data Prep via Google Sheets Template
Project Binder provides a Google Sheets template to organize and import your data quickly. Using the template can save hours compared to manual entry. You’ll receive an invite link upon account creation. Google will prompt you to copy the template to your own account.
Template Overview
The template contains tabs for Services and Rental Products. Additional tabs for People and Accessories are reserved for a future release. Each tab has example data you can overwrite.

The Project Binder Ingest Template in Google Sheets
Services Tab
| Column | Field | Description | Type |
|---|---|---|---|
| A | Name | Service name (e.g., Producer, DP, Grip) | Text |
| B | Description | Internal only; not client-facing | Text |
| C | Category | Highest organizational level | Text |
| D | Group | Second organizational level | Text |
| E | Group Sub | Third organizational level (subgroup) | Text |
| F | Per Unit Price | How much you bill per UOM | Number |
| G | Per Unit Cost | What it costs you per UOM | Number |
| H | Per Unit Profit | Price − Cost (auto-calculated) | Number |
| I | UOM | Unit of Measurement (Day, Hour) | Text |
| J | Subcontract | Do you subcontract this service? | Yes/No |
| K | Default | Add to every new estimate by default? | Yes/No |
| L | Multiple | Can there be multiples? (e.g., 3 Grips) | Yes/No |
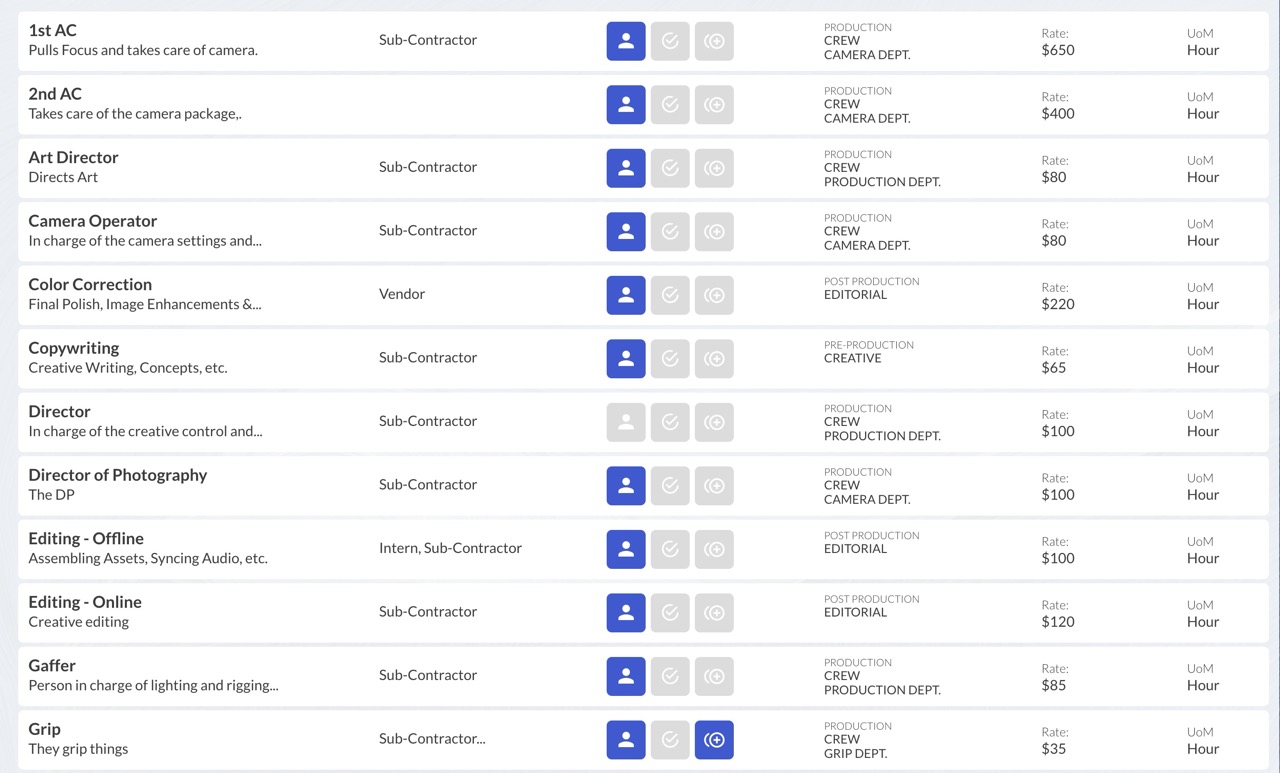
Services listed in the Settings menu
Rental Products Tab
More columns than Services because equipment requires detailed tracking. Only list primary products (camera bodies, lights, recorders). Accessories like cables and batteries are entered separately as Rental Items inside Project Binder.
| Column | Field | Description | Type |
|---|---|---|---|
| A | Manufacturer | Spelled identically across entries | Text |
| B | Model Number | Full model (e.g., Canon EOS C400) | Text |
| C | Name | Client-facing shorthand (e.g., C400) | Text |
| D | Description | Internal-only description | Text |
| E | Category | Organizational group — Category | Text |
| F | Group | Organizational group — Group | Text |
| G | Group Sub | Organizational group — Subgroup | Text |
| H | Purchase Date | When you bought this item | Date |
| I | Purchase Price | What you paid | Number |
| J | Rental Price | What you charge to rent it per UOM | Number |
| K | Rental Cost | What it costs you (0 if owned outright) | Number |
| L | Rental Profit | Price − Cost (auto-calculated) | Number |
| M | Serial Number | Must be unique | Text |
| N | Replacement Cost | Current cost to replace if destroyed | Number |
| O | Barcode | Unique barcode/tag ID | Text |
| P | UOM | Unit of Measurement (typically Day) | Text |
| Q | Camera | Is this a camera body? | Yes/No |
| R | Rent Out | Available for external rental? | Yes/No |
| S | Default | Add to every estimate by default? | Yes/No |
| T | DNI | Do Not Inventory (record-keeping only) | Yes/No |
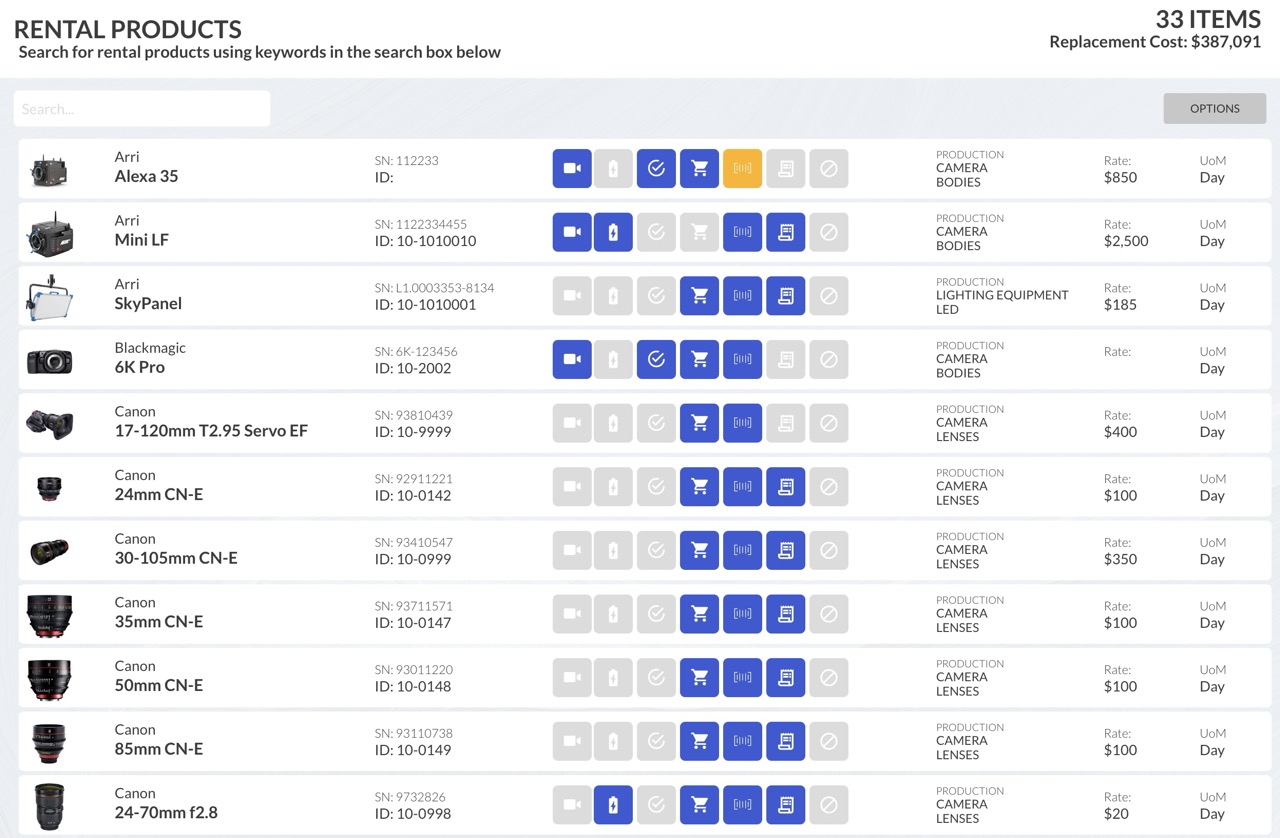
Rental Products listed in the Settings menu
Organizational Groups
Three hierarchical levels: Category (e.g., Production), Group (e.g., Camera Equipment), and Subgroup (e.g., Bodies, Lenses). These determine how estimates, budgets, and printouts are organized. Spelling must be identical across entries — any variation creates a duplicate.
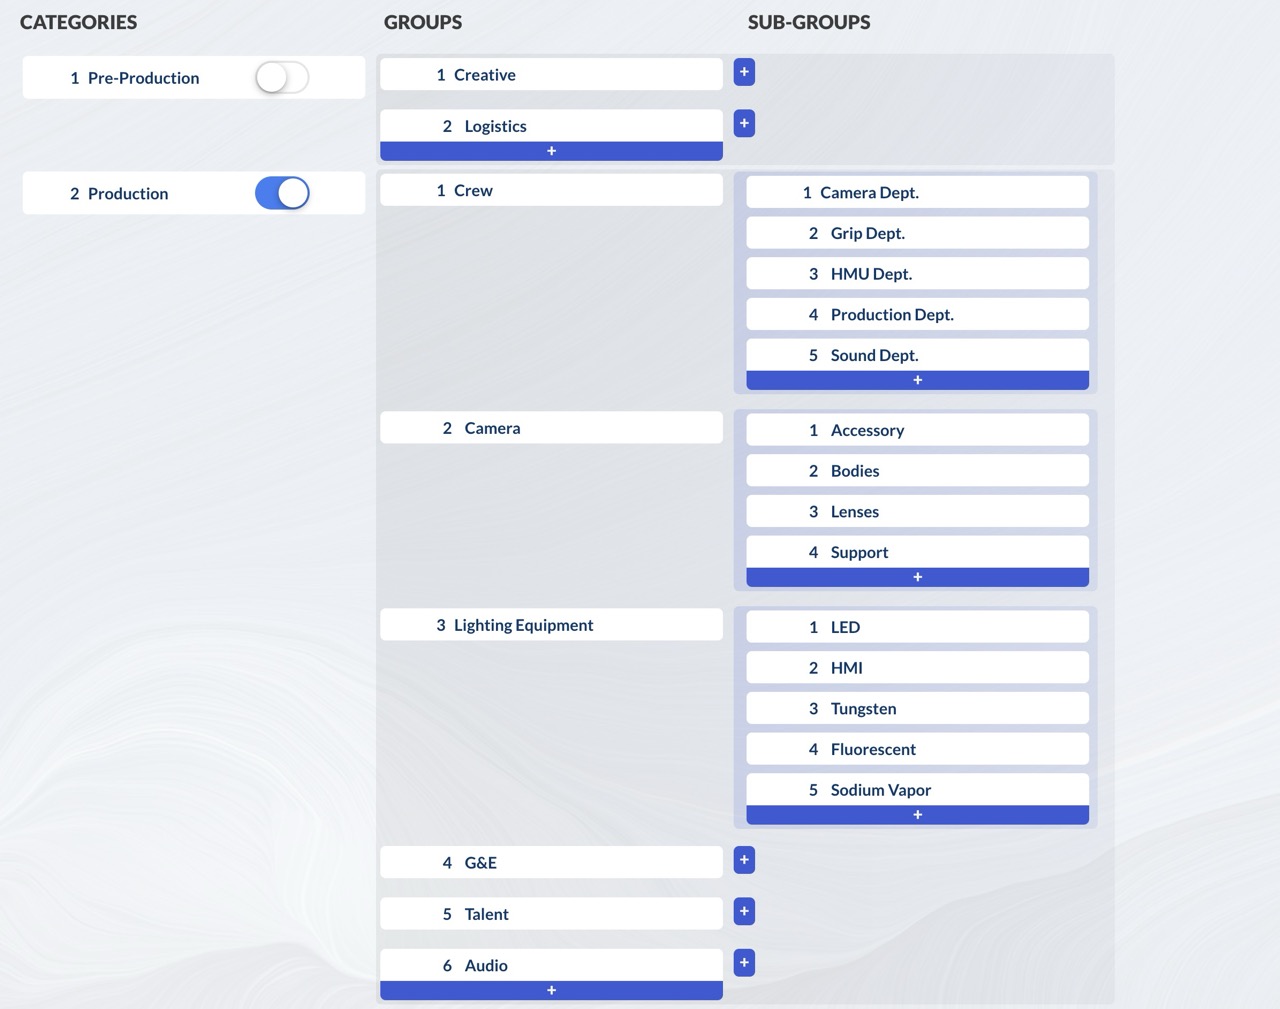
Organizational Groups: Category > Group > Subgroup
Exporting & Importing
Export each tab as a separate CSV: File > Download > Comma Separated Values (.csv). Import into Project Binder under Settings > Products & Services > Options > Import CSV.
Before exporting, verify: every required field has data, no empty rows at the bottom, all Yes/No fields are answered, numerical values have no dollar signs or commas.
3. Company Settings
Access Settings via the gear icon in the top-right header. Settings are organized into cells, each controlling a different area.
User Account & Company Info
Top-left cell: your name, position, email, phone, hourly rate, and profile photo. Your headshot appears next to tasks and assignments throughout the app. Below that: company name, logo, address, phone, and website — these appear on estimate printouts.
Contact Settings
Company & Person Relationship Types
Tags for classifying contacts. Companies: Client, Rental House, Vendor, etc. People: Client, Subcontractor, Intern, etc. The key is the “Provides a Service” checkbox — enable it for Subcontractor so you can assign services and rates to those contacts.
Questionnaire Builder
Create reusable question sets for different project types or client conversations. Seven question types: Text, Date, Link, Image, Document, Address, and User. When creating a lead, select a questionnaire and those questions load automatically.
Products & Services
Manufacturers
Pre-configured list of equipment brands. Add as needed; avoid deleting manufacturers that are attached to products.
Organizational Groups
Manage your Category > Group > Subgroup hierarchy. Add, reorder, and delete (only if empty). Do not enter services or products here — this is strictly organizational structure.
Units of Measurement
Day, Hour, Week, etc. Each unit has a plural form for grammar. Autofill: auto-populates quantities based on shoot duration. Warn: flags line items below a minimum quantity (yellow = low, red = critical).
Estimates & Projects
Project Tiers — classify projects by complexity level (optional). Revision Policy — referenced by the AI SOW generator. Job Types — tags for dashboard items (Video, Photo, Event, etc.). Starting Numbers — set where your project numbering begins (useful when migrating). Statuses — granular project states with color coding and “Hide from Dashboard” option. Terms & Conditions — fine print on every estimate printout. Invoices — payment terms and instructions.
Company Settings Cell
Account Subscription — Stripe portal for billing management. Default Margin & Markup — choose calculation method for custom line items. Equipment Manager — designate a user and configure scan settings (Production Company tier). Project Folder Structure — upload a ZIP template for standardized project folders. Users — invite, modify, and manage team members.
4. User & Personal Settings
The “My Settings” cell controls your personal experience, separate from company-wide settings.
Google Calendar Integration
Three separate calendar connections:
- Personal Calendar — meetings, appointments, personal events
- Production Calendar — shared calendar for shoot dates (admin creates in Google)
- Rental Calendar — equipment reservation and scheduling
Connect via Google OAuth, then assign each calendar from dropdown menus and set distinct colors. The calendar icon in the header shows a combined view of all three. All-day events are solid bars; hourly events show a colored dot.
Other Settings
KPI Visibility — toggle dashboard metrics on/off. Notification Preferences — in-app, email, and/or SMS for tasks, chat mentions, and booking responses. Visibility Options — hide redundant subtotals on estimates. Background Image — customize your dashboard wallpaper. Change Password — self-explanatory.
5. Services Setup
Found under Settings > Products & Services > Services. Lists every service your company offers.
Adding Services Manually
Options > Add New. Enter: service name, internal description, price (what you bill), cost (what it costs you), then configure toggles:
- Subcontract — enables subcontractors to appear in crew assignment dropdowns
- Default — auto-includes on every new estimate
- Offer in Multiples — allows multiple units (e.g., 3 Grips on one line)
Assign the organizational group and unit of measurement. Pre/post-production is typically billed hourly; production by the day.
Importing & Editing
Import via CSV (Options > Import CSV) following the same process as rental products. Click any service row to edit: title, description, rate, cost, organizational group, toggles, and the tag specifying which relationship types can perform this service.
6. Rental Products Setup
Rental Products are your primary equipment: camera bodies, lights, lenses, audio recorders, tripods. Accessories (batteries, cables, cards) are tracked separately as Rental Items.
Adding Rental Products
Settings > Products & Services > Rental Products > Options > Add New. Fields include: Manufacturer (with Google Image thumbnail auto-search), Model Number (type to match existing or create new), Product Name (client-facing shorthand), toggles (Default, Camera, Rent Out, DNI), Serial Number, Barcode ID, pricing (Rental Price, Cost, Replacement Cost, Purchase Price/Date), and organizational group placement.
Importing via CSV
Options > Import CSV. Upload your CSV, verify field mapping (automatic if headers unchanged), review the preview. Orange highlights indicate unmatched groups needing manual selection. Click Add Rental Products. Thumbnails will be blank for CSV imports — search for images on the product page afterward.
Rental Items (Accessories)
Entered manually under Settings > Products & Services > Rental Items. Each item has: Manufacturer, Model Number, Name, Item Type, Short Code (3–4 char display abbreviation), Serial Number, Barcode ID, pricing, and a Notable toggle.
Items can be Linked (permanently fixed to a specific rental product) or Non-Linked (available to any compatible product based on a compatibility list you configure).
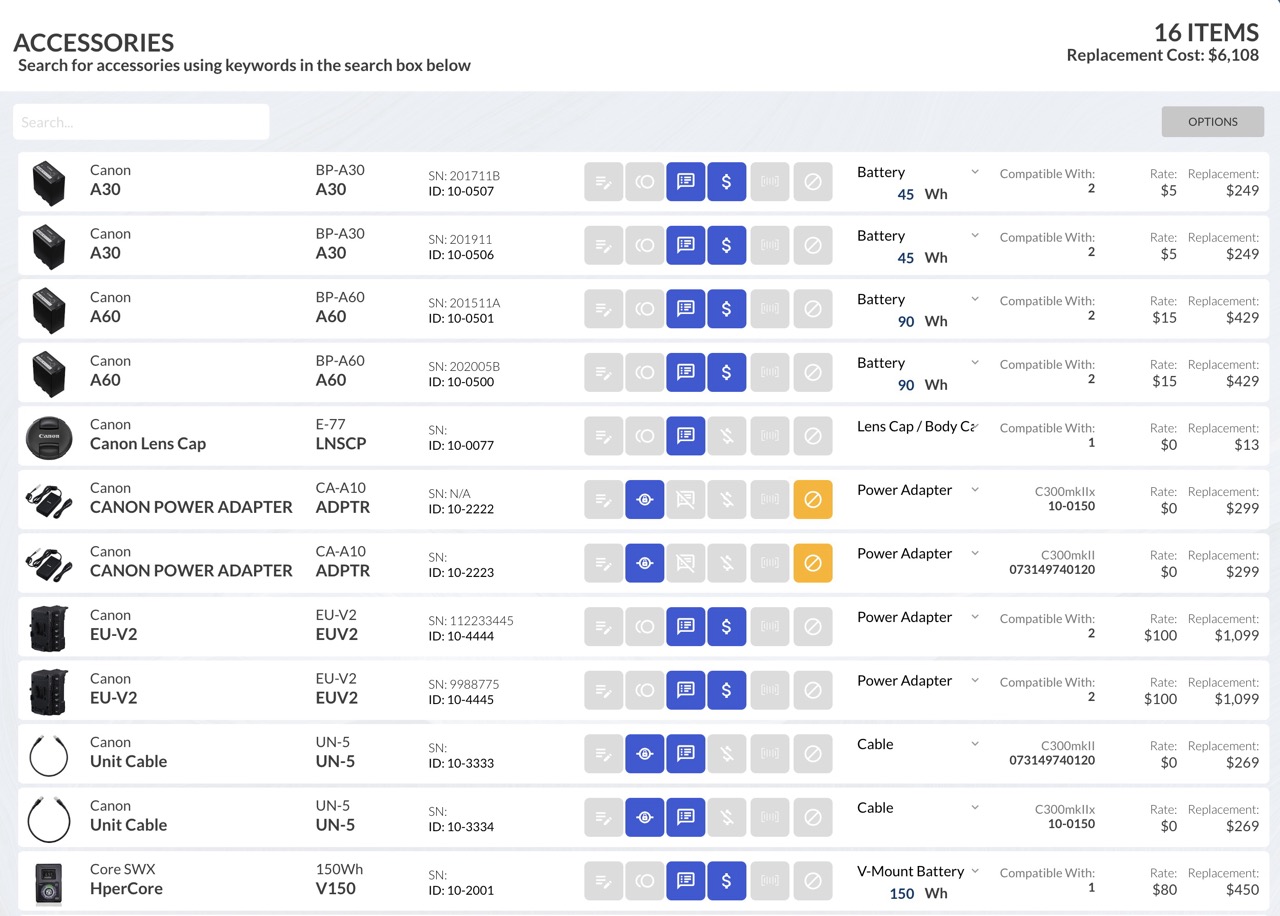
Accessories (Rental Items) in the Settings menu
Rental Packages
Bundle products and items into kits (e.g., Sound Kit with lavs, boom, recorder, slate, headphones). On estimates, packages appear as a single expandable line item. At the Production Company tier, scanning a package barcode twice checks out all contents.
7. Dashboard Overview
Your homepage and command center. At a glance: open projects, upcoming tasks, today’s calendar, and KPIs.
Dashboard Items
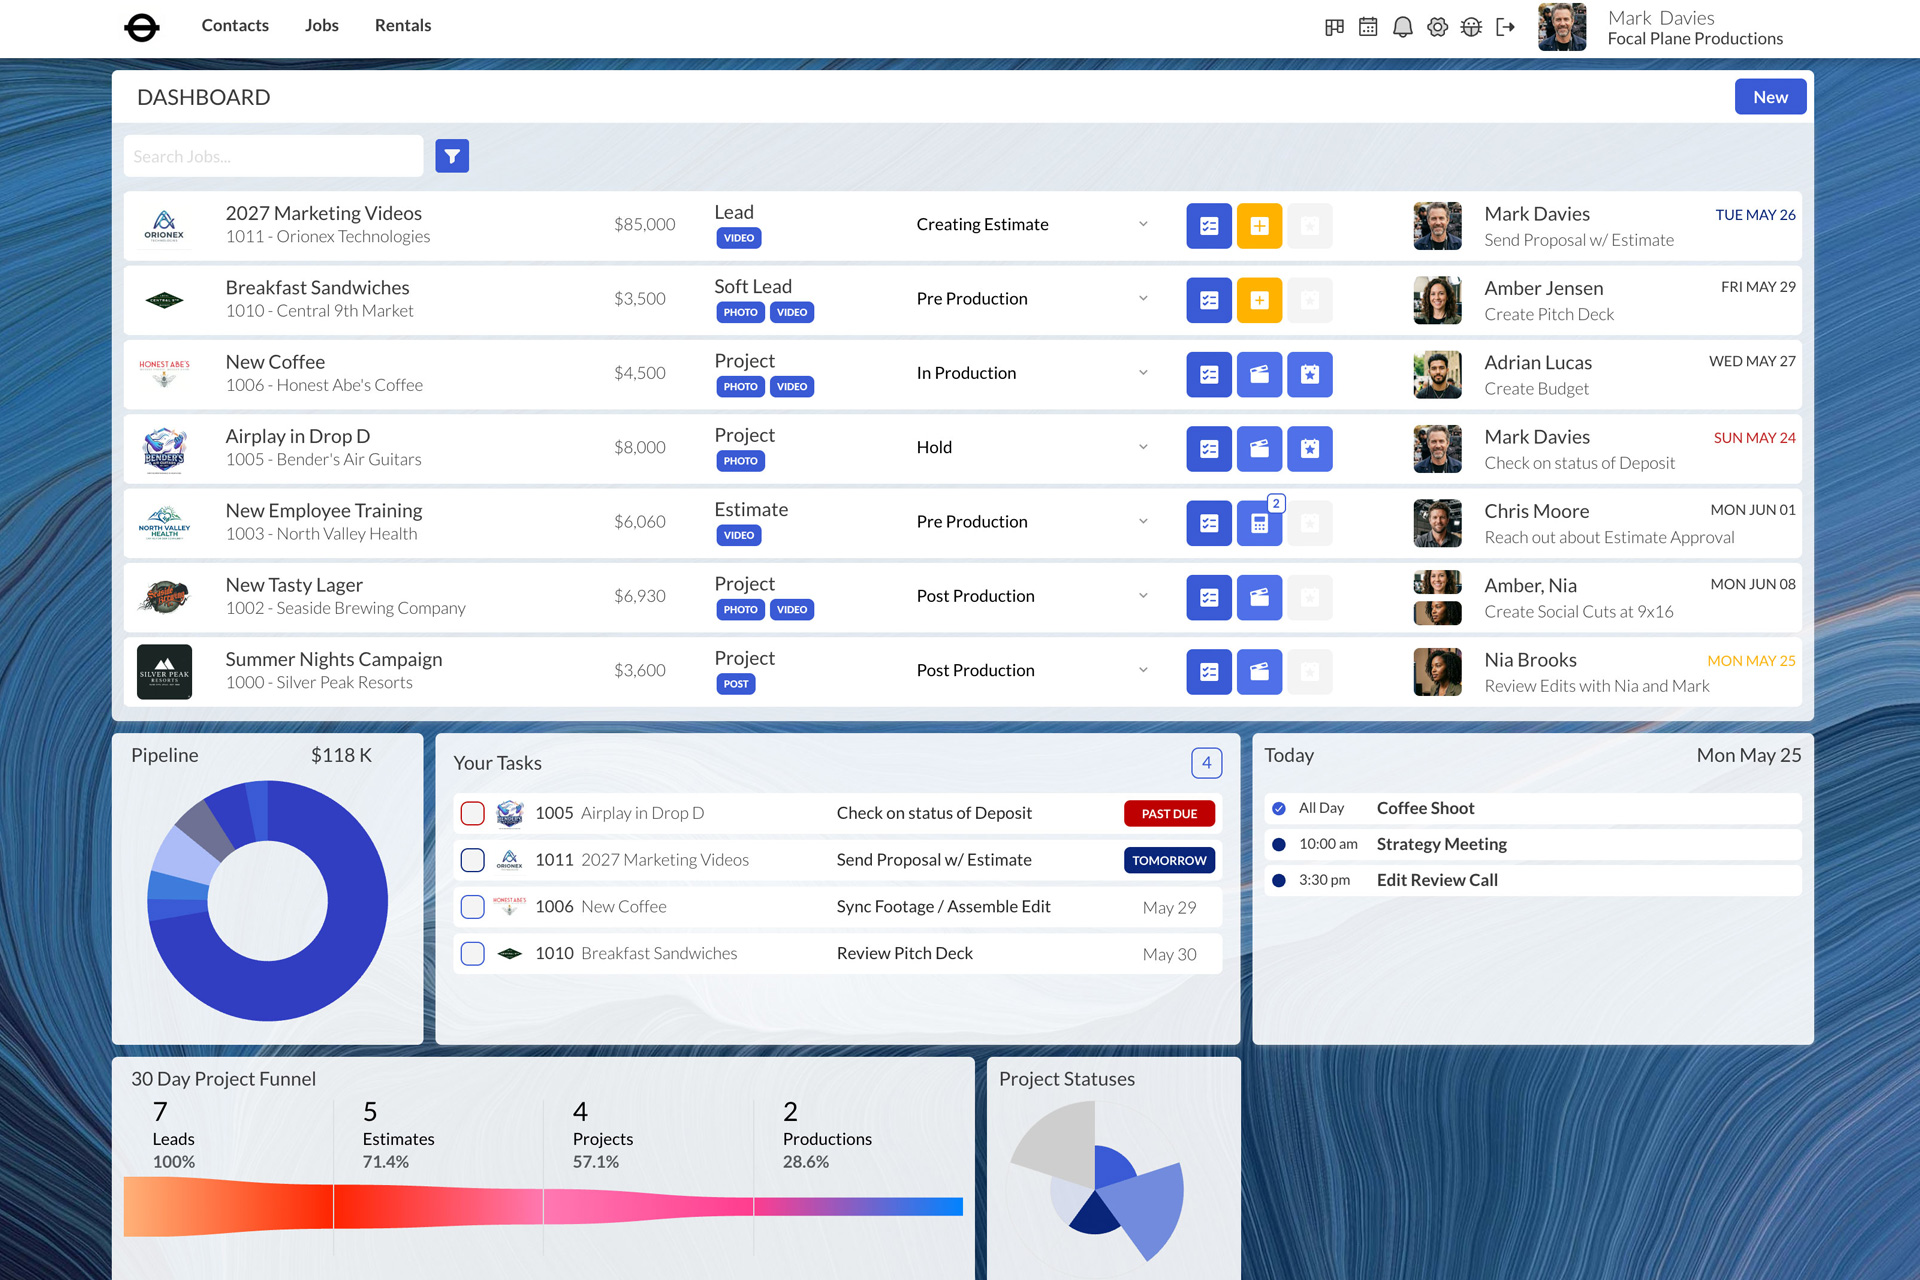
The main cell lists all open projects. Each row shows: company logo, project name, number, company, estimated budget, stage (Soft Lead/Lead/Estimate/Project), status, and the next due task with the assignee’s avatar.
Tasks are color-coded: blue = upcoming, yellow = due today, red = overdue. Paginates after 10–15 items. Search by project name or company; filter by stage using the filter icon.
Action Icons
Each item has icons: checklist (Notes/Tasks/Docs popup), estimate status (orange + = needs estimate, blue calculator = estimates exist, movie slate = converted to project).
Pipeline, Tasks & Calendar
Pipeline — pie chart of your 30-day project funnel with hover details. Your Tasks — all tasks across all projects, sorted by nearest deadline. Today’s Calendar — events from all three Google Calendars.
8. Lead Management
Project lifecycle: Soft Lead → Lead → Estimate → Project → Production → Reconcile
Soft Leads vs. Leads
Soft Lead: Someone you’ve never worked with. Not in your database, not yet qualified. Entry point for cold calls, web inquiries, and referrals.
Lead: An existing contact — returning client or known person. Fields auto-populate from the database.
Creating a Soft Lead
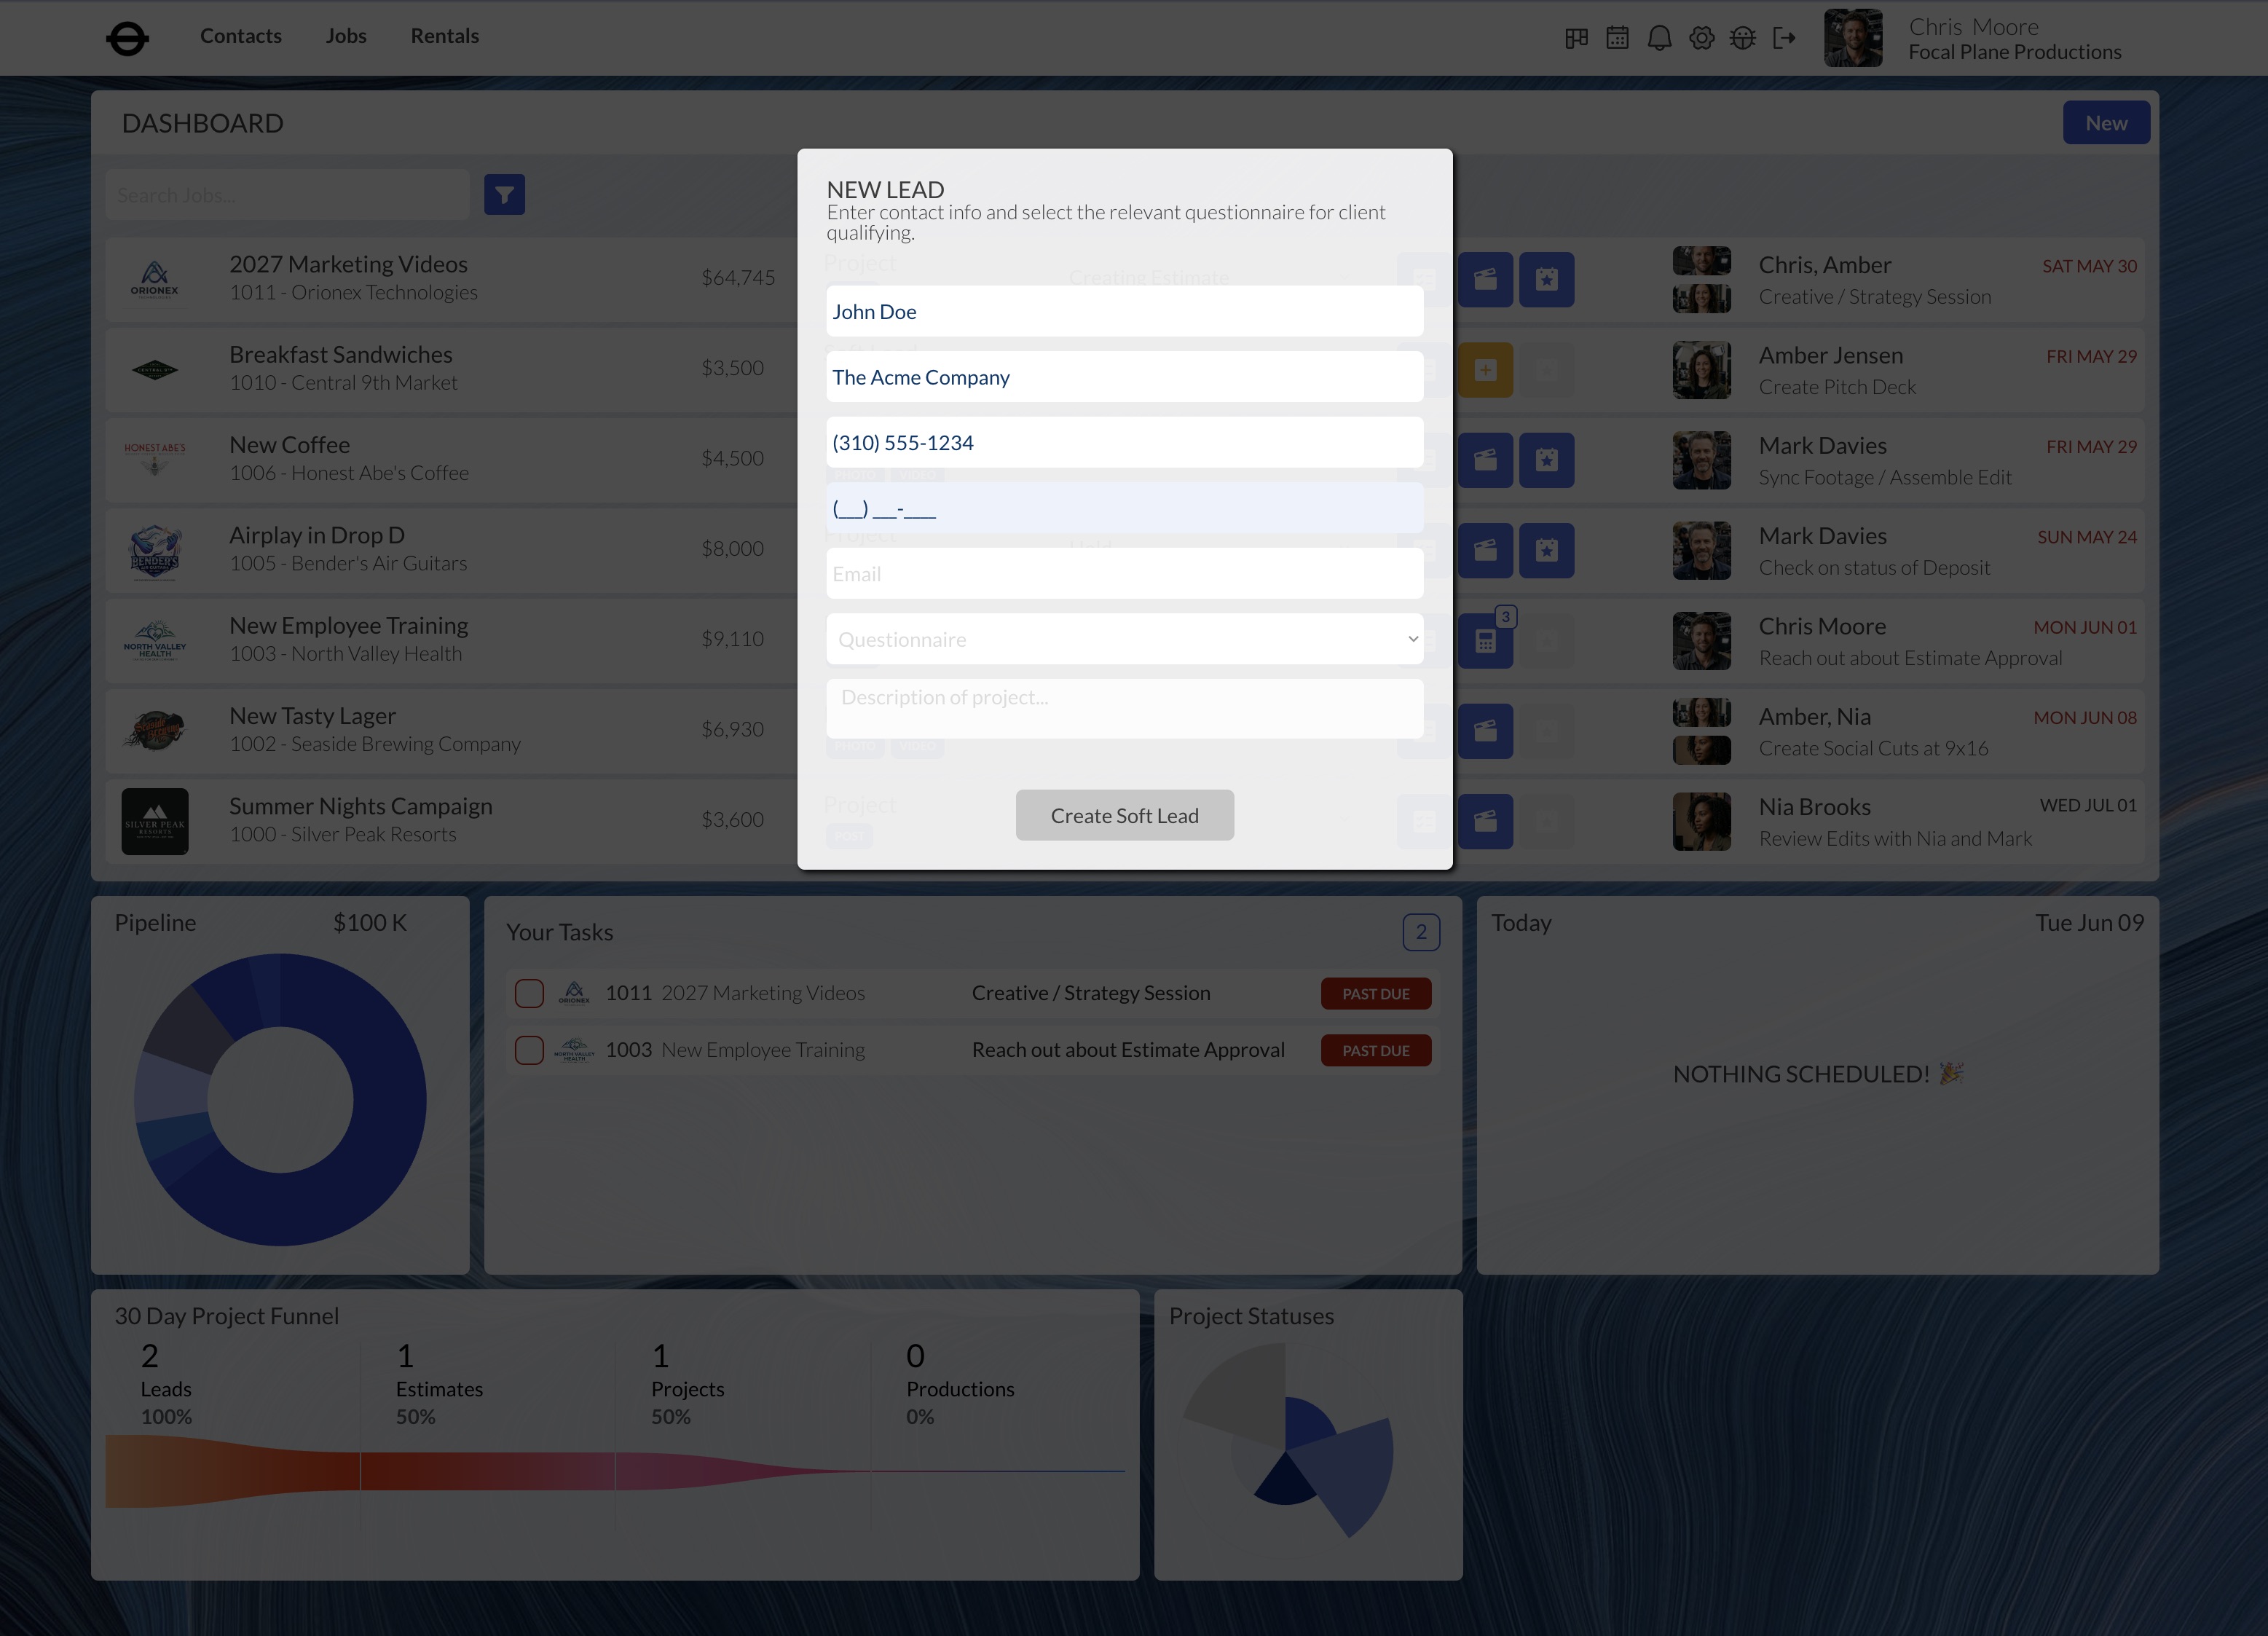
Dashboard > New > Lead. Enter: name, company, phone, email, select a questionnaire, add a project description. Click “Create Soft Lead.”
Project Binder opens the questionnaire with four default questions: (1) Project name, (2) Approximate budget, (3) Current status, (4) First task. The fourth triggers task creation with due date, assignees, and notification options. Your selected questionnaire’s questions follow.
Converting to Lead
Click the orange “+” icon. Google Places searches for the company — Quick Add pulls in address, phone, logo, and website with one click. Or use Manual Add. Set the Company Relationship Type and Account Manager, then create the person record. The Soft Lead converts to a Lead.
Creating a Lead (Existing Contact)
Dashboard > New > Lead. Start typing — existing contacts appear in a dropdown. Select to auto-populate. Or skip straight to New > Estimate and pick the company/person from dropdowns.
9. Notes, Tasks & Documents
A centralized hub for all project information and communication. Accessible from the Dashboard (checklist icon) and from within the Project Builder page. Contains five tabs.
Overview
Description — client-facing, appears on estimate printouts. Internal Notes — private notes for your team. Chat — threaded messaging scoped to this project, with @mention notifications.
Questionnaire
All questions and answers from lead qualification. Add more anytime with seven question types. The “List” button merges in additional questionnaires.
Tasks
Create, assign (up to 3 people), and track. Due-date color coding (blue/yellow/red). Notify assignees and get notified on completion. Check to complete; click the undo icon to reactivate.
Documents
Upload project files (proposals, SOWs, agreements, releases, scripts). The AI SOW generator (Producer+ tiers) creates statements of work from your project data. Download Project Folder generates a standardized folder structure ZIP.
Deliverables
Technical specs for deliverables: format, resolution, frame rate, codec. Feeds into the Brief and SOW generator.
10. Estimate Builder
Where you assemble detailed project cost breakdowns, pulling from your entire database of services, products, and packages.
Creating an Estimate
Click the estimate icon or New > Estimate. Enter basic project info, then browse your database by category tabs. Check items to include; specify multiples where needed. Click Create Estimate and enter shoot hours and days. Quantities auto-populate based on your autofill settings.
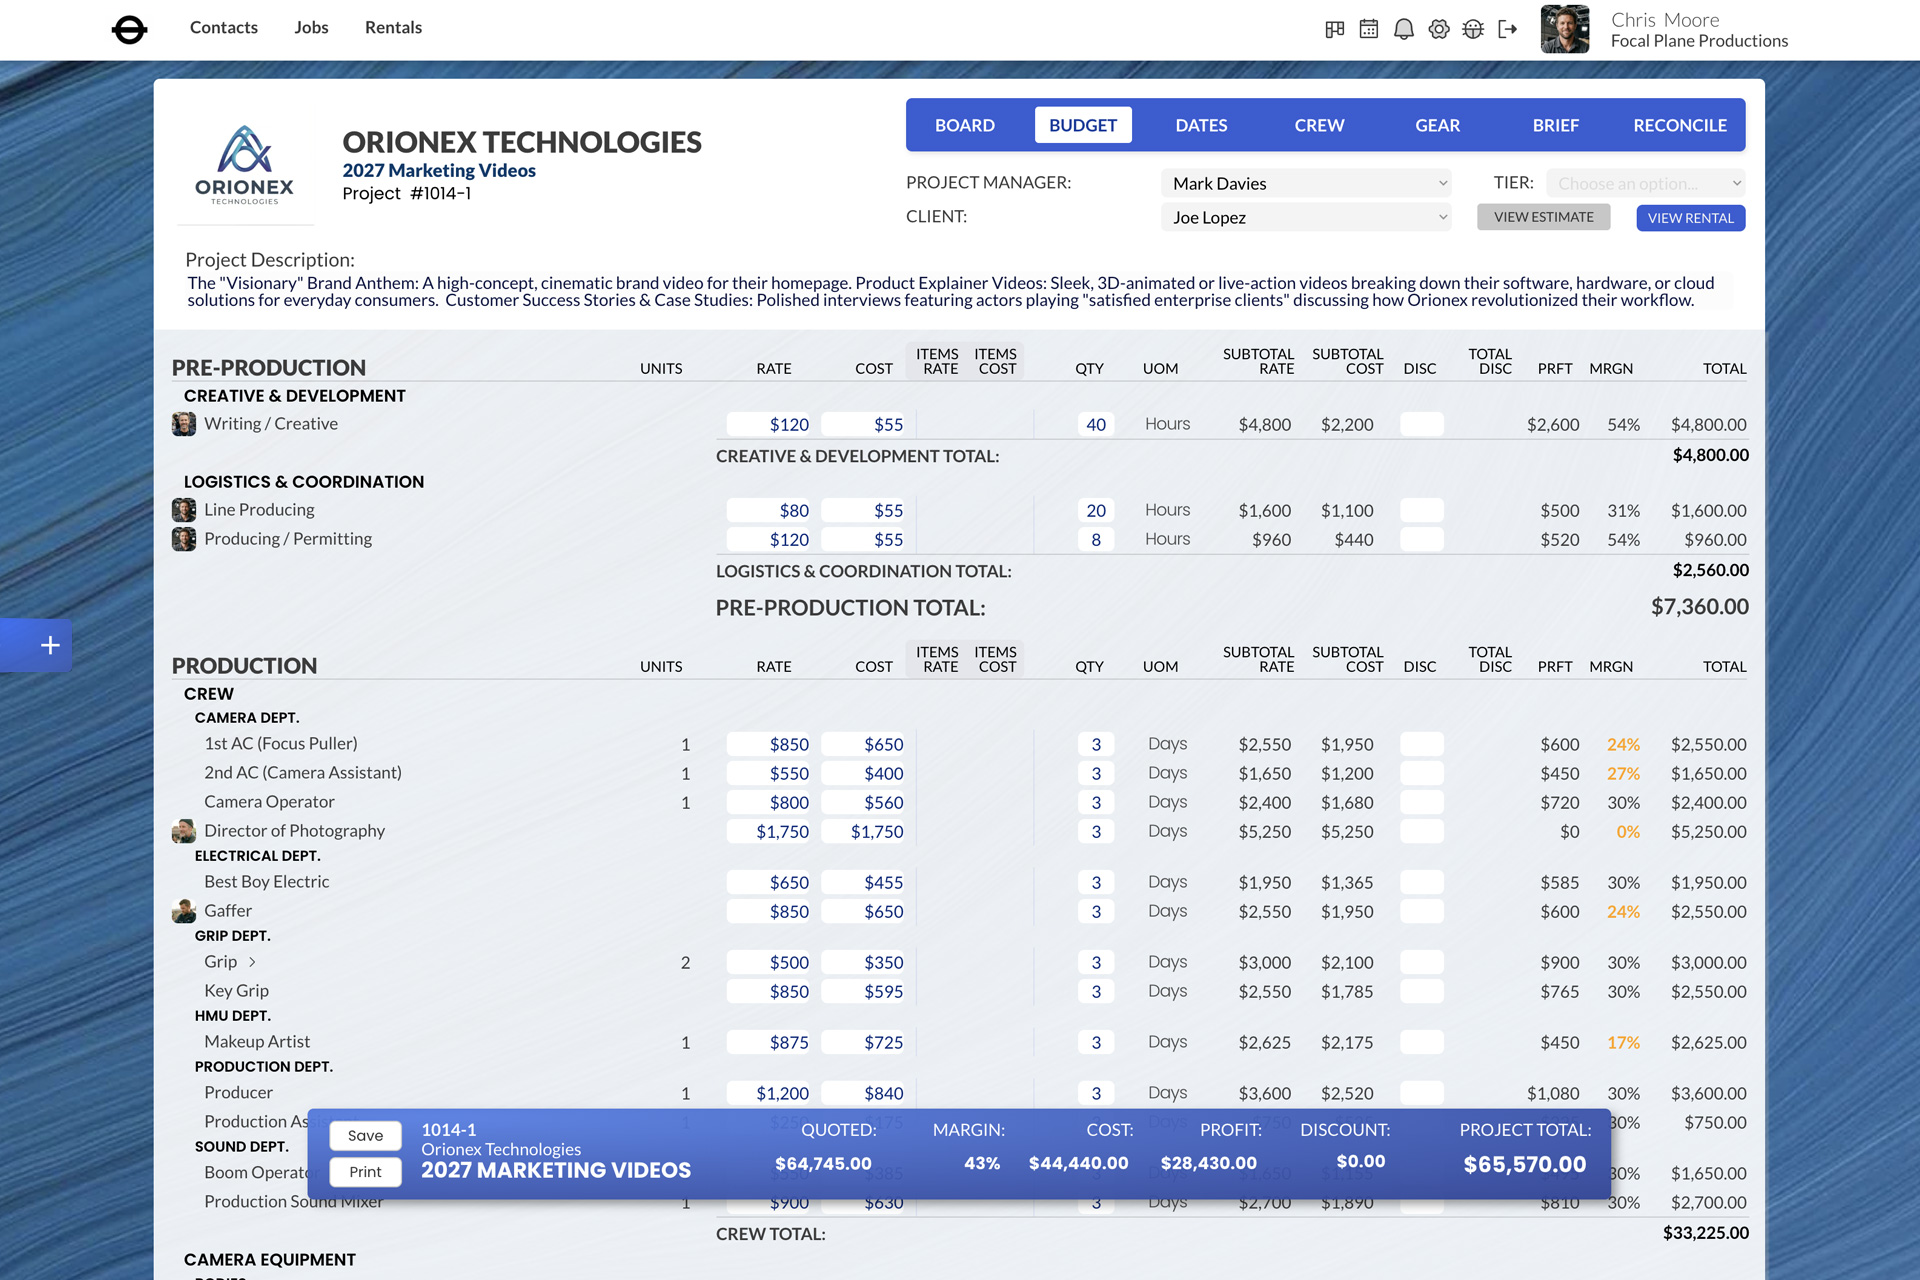
The Estimate Spreadsheet
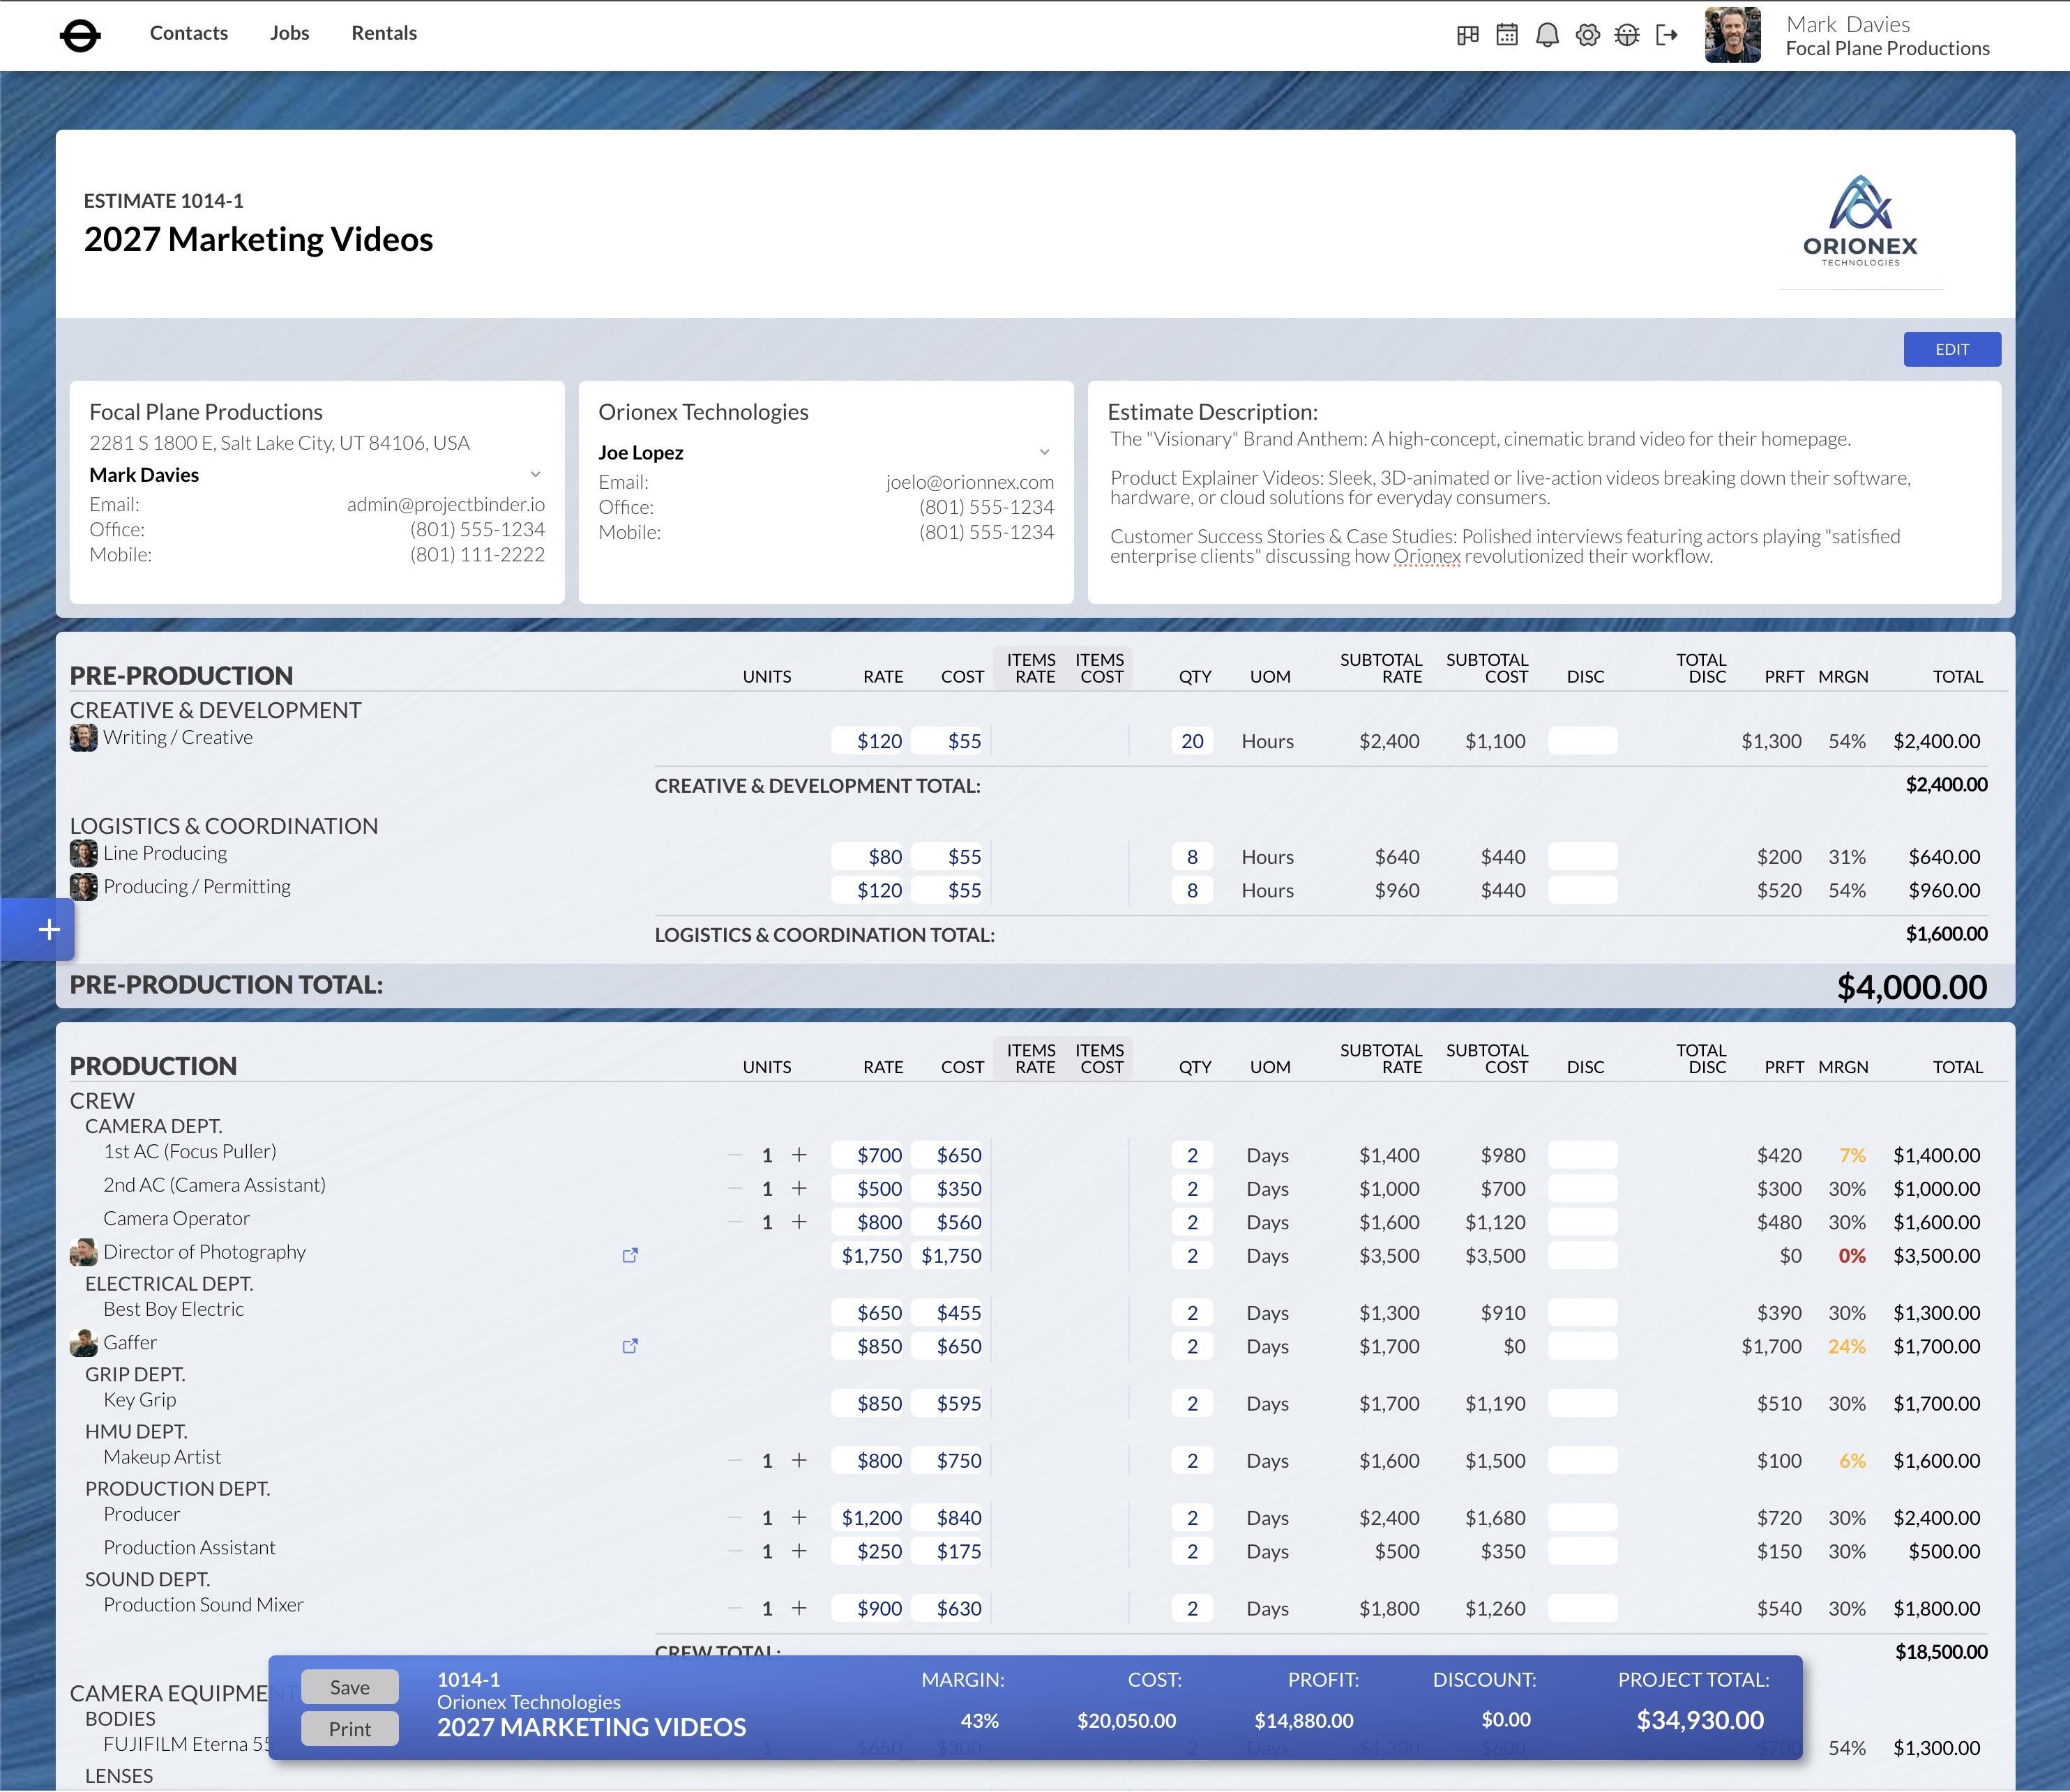
An interactive spreadsheet organized by category/group/subgroup. Each line item shows: Units, Rate, Cost, Quantity, UOM, Subtotals, Discount %, Profit, Margin, and Total. White fields are editable. A floating bar shows the running project total, margin, cost, profit, and discounts.
Assigning People
Click any service line item to assign an employee or approved subcontractor. Cost updates to reflect their rate. For multiples, each unit gets its own person assignment with averaged costs.
Custom Line Items & Modifiers
The floating “+” menu adds: database items (Service, Rental Package/Product/Item), Custom items (one-off services, products, or expenses), and Modifiers (project-level dollar or percentage adjustments like a Production Fee or New Client Discount). Modifiers can be reordered to change calculation sequence.
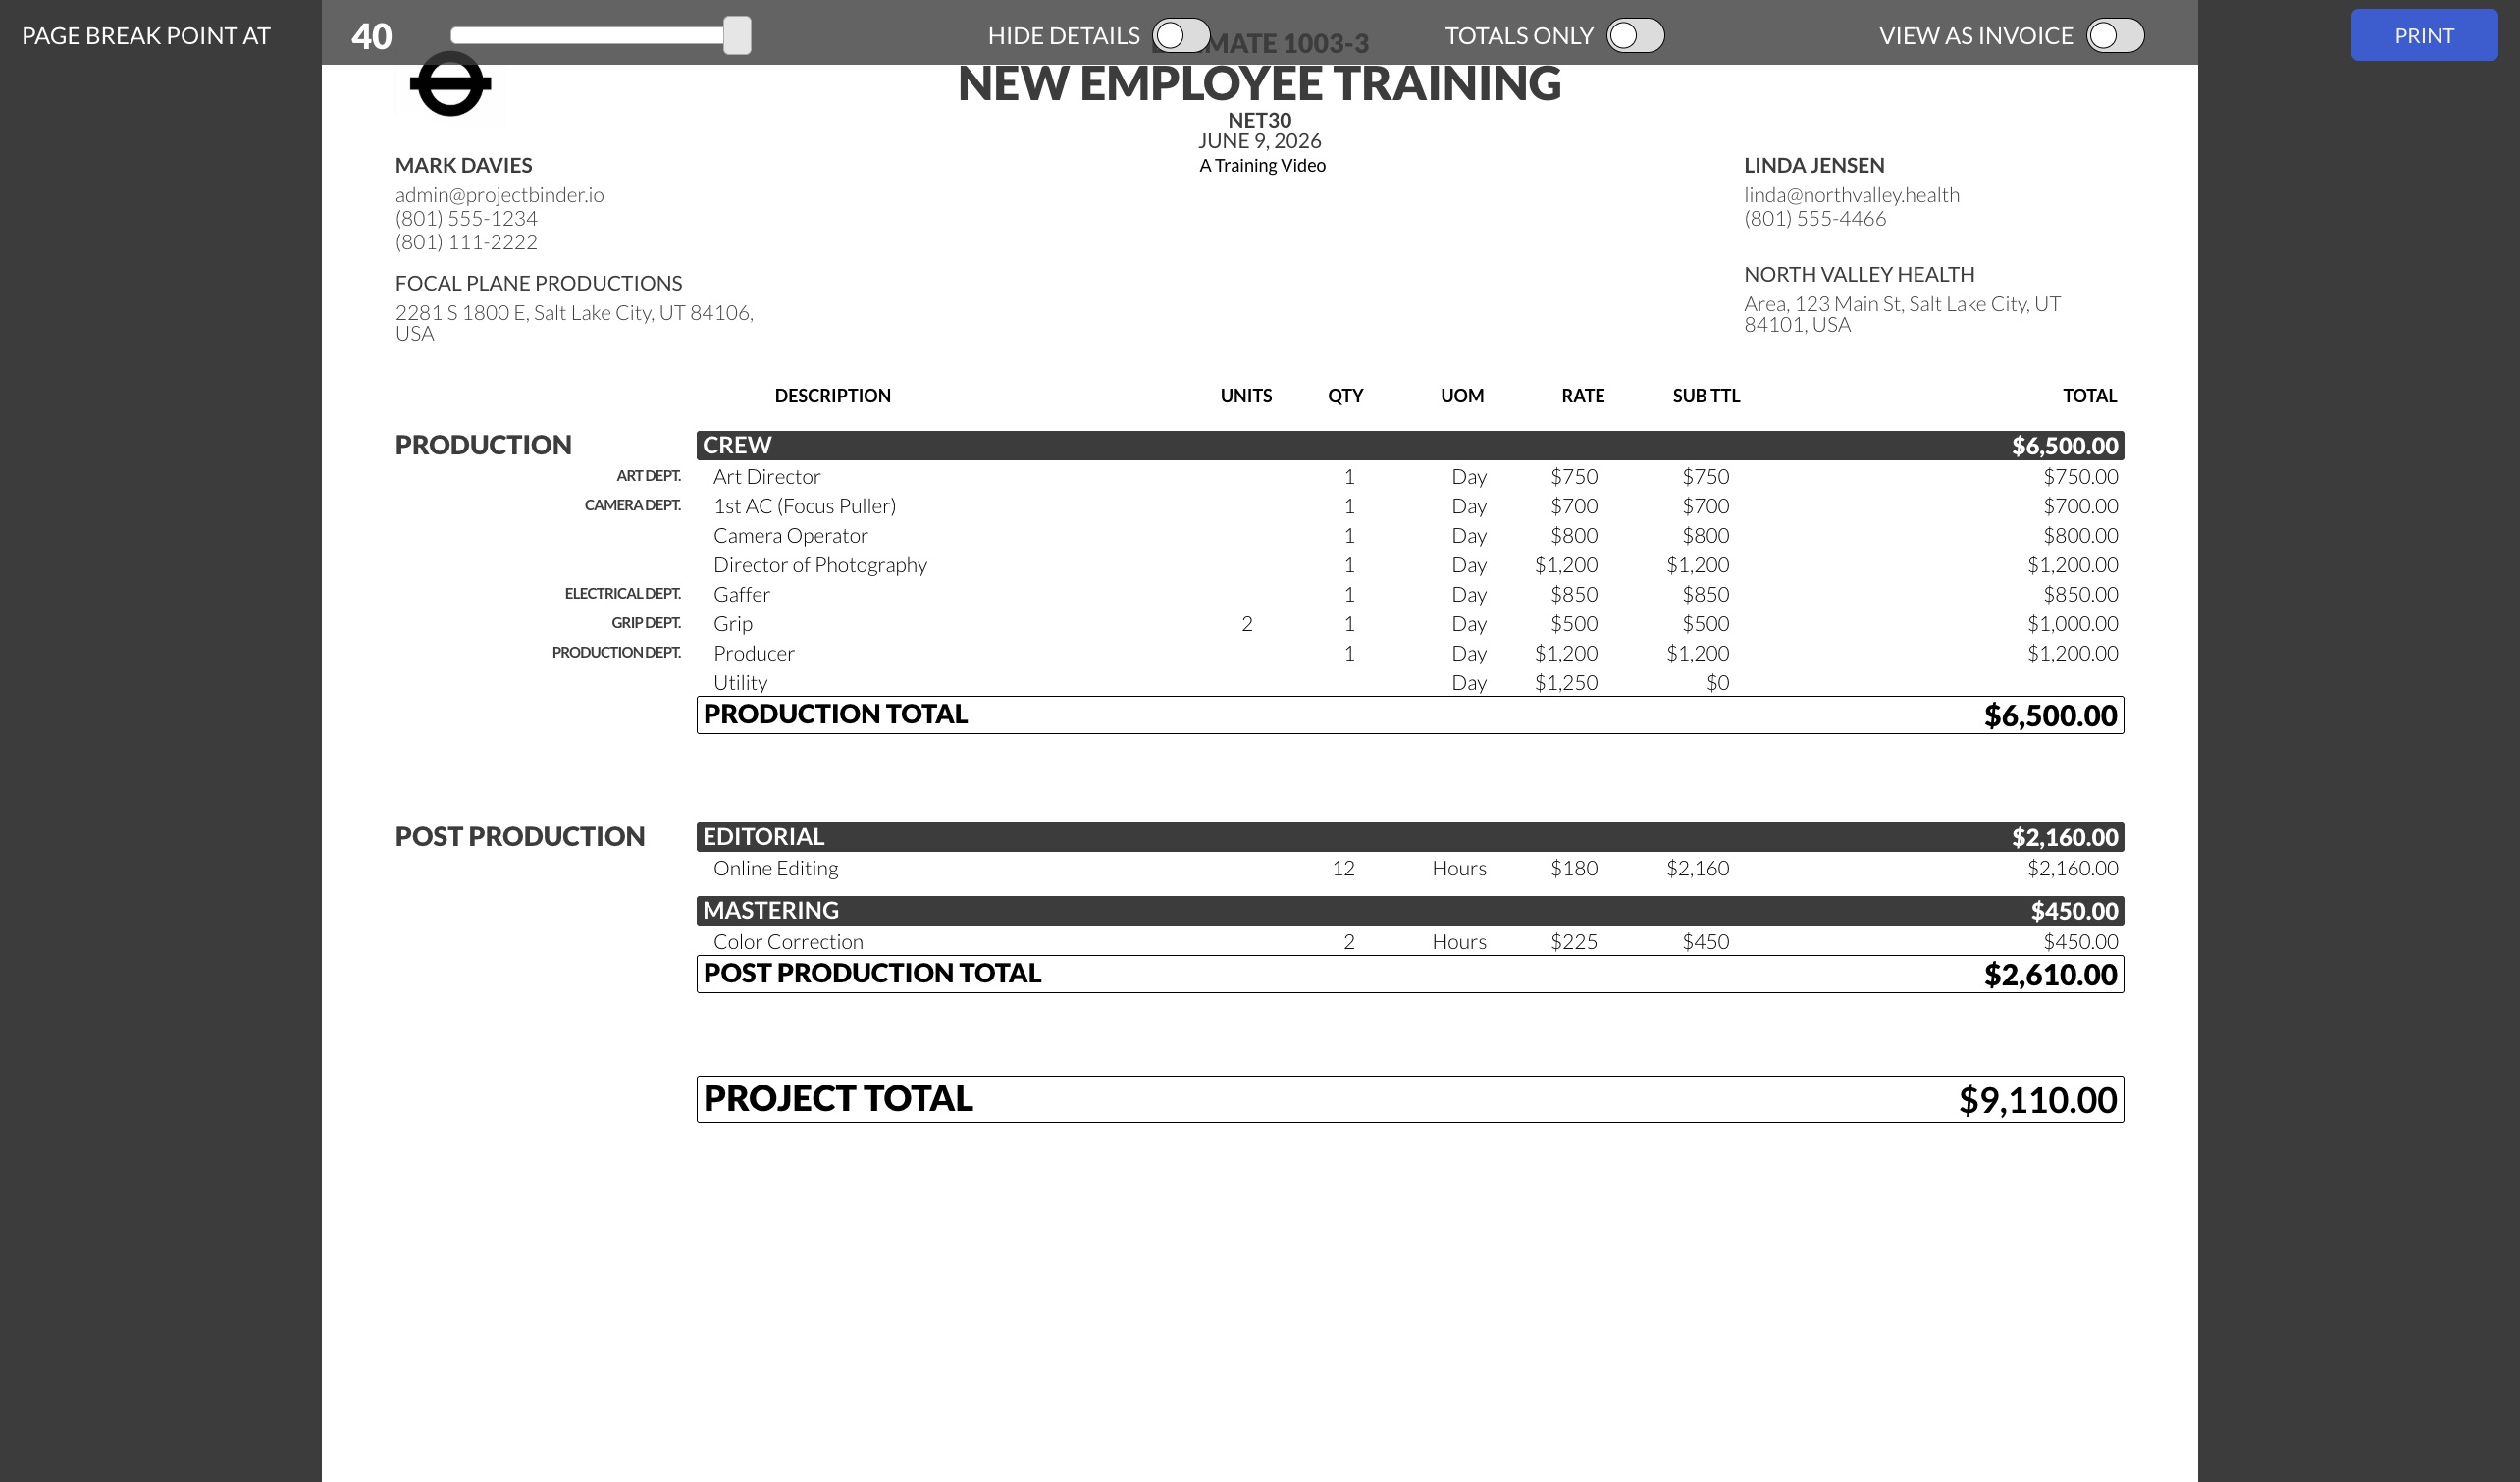
Revisions & Print
Multiple estimates per project for good/better/best scenarios. Create revisions via Edit > Create Revision. Print opens a formatted document with toggle options: Hide Details (group subtotals only), Totals Only (category-level), View as Invoice. Save as a professionally named PDF with one click.
11. Project Builder & Production
Available on Producer and Production Company tiers. Convert an approved estimate via Edit > Convert to Project (one-way, locks the estimate).
Board
The Notes, Tasks & Documents hub, embedded as a tab in the Project Builder.
Budget
Like the Estimate Builder, but now your working budget. Changes from the original are highlighted. The floating total bar includes a “Quoted” section comparing original estimate vs. current budget.
Dates
Set production dates via Google Calendar integration. Each date creates a calendar event and a rental reservation. Production dates must be set before accessing Crew and Gear tabs.
Crew
Book your crew for each production date. The standout feature: send availability requests via SMS, email, and/or in-app notification. Messages are editable, include project/position/rate details, and recipients click Yes or No. Colored indicator lights show status: green (confirmed), red (declined), yellow (pending). You’re notified of each response.
Gear
Reserve equipment for production dates. Project Binder prevents double-booking and offers alternatives if conflicts arise. Reserved gear populates the equipment manager’s checklist.
Brief (Coming Soon)
Detailed production briefs for remote crews: codec settings, audio inputs, card labeling, questionnaire answers, and a simplified call sheet. Printable as PDF.
Reconcile
Post-production wrap-up: enter actual costs, rate/review subcontractors (5-star system), lock entries, and compare estimated vs. actual margins. Close and archive when done.
12. Contacts & Jobs
Accessible from the header navigation throughout the app.
People
Database of all contacts. Dynamic search by name, company, or relationship type. Click to view/edit details, search for a photo via Google Images, or manage services and rates. Subcontractors have a Disable toggle for temporary removal from dropdowns. Add new people via Options > Add Person.
Companies
All companies with logos and employee headshots. Each shows: project count, people count, and rental/production count. Click for detailed KPIs: total jobs, year-to-date, win rate, average margins, past job history, and account notes. Add via Quick Add (Google Places) or Manual Add.
Jobs
Complete project history — your archive. Every project ever entered lives here permanently, including closed and hidden items. Search and access full details: estimates, tasks, documents, chat, budget.
Rentals (Coming Soon)
Production Company tier. Upcoming and past rentals with barcode scan in/out, pick lists, transaction logs, add-on tracking, and reconciliation tools.
Project Lifecycle
| Stage | Description | Tier |
|---|---|---|
| Soft Lead | New unqualified contact; not yet in database | All |
| Lead | Qualified contact; ready for estimate | All |
| Estimate | Detailed cost breakdown for client approval | All |
| Project | Approved estimate → working budget + crew/gear booking | Producer+ |
| Production | Dates locked, crew booked, gear reserved | Producer+ |
| Reconcile | Actual costs entered, project archived | Producer+ |
Settings Checklist
- Upload company logo and contact info
- Set your personal hourly rate
- Connect Google Calendar (all three calendars)
- Configure notification preferences
- Set up organizational groups (Category > Group > Subgroup)
- Import services via CSV or add manually
- Import rental products via CSV or add manually
- Create at least one questionnaire
- Set up company and person relationship types
- Configure terms and conditions
- Set starting project number (if migrating)
- Create statuses with color codes
- Upload project folder structure template
- Invite team members
For support, contact support@projectbinder.io | app.projectbinder.io